Sunday, July 28, 2013

Homemade Sushi


Ever since we started working on the Kids Culinary Passport together, I knew when we did get to Japan I definitely wanted to try my hand at making sushi with Lily. So this morning, we all went over to the Japanese Market, Mitsuwa in Irvine to pick up everything we would need.  A friend of mine has invited us over in the past and made handrolls for us and I always wanted to make them at home and today we did.  I was a little timid about making sushi.  I thought it would be really hard.  It's actually not hard at all, there is just a lot of preparation that goes into it. I used the Japanese Home Cooking Cookbook by Shunsake Fukushima to get the basic idea of how to make sushi and then my husband and my daughter Lily just used our imagination to think of what we could put as the filling.


Lily placed the bamboo placemat on the butcher block cutting board. She then placed a nori sheet on to it--rough side facing up.
We made special sushi rice by making a special sushi vinegar.  We placed 1/2 cup of rice vinegar and 1 tsp. of salt into a small saucepan over low heat and stirred it until the salt dissolved. Then we added 1 tbs. of sugar and 1 tsp. of mirin and continued to stir briskly until the sugar was dissolved.  It is important not to let the mixture boil and to remove the saucepan from the heat when it is too hot to touch.  Then after we put the hot rice in a bowl we added the sushi vinegar slowly to the rice and distributed it evenly with a rice paddle. We let it sit and cool to room temperature before we preceded to the next step.
My husband spread the rice over the nori sheet , being careful not to rip it, until the sheet was 3/4 covered with a thin layer of rice.

Lily and her Daddy wet their hands while putting the rice onto the nori, so it wouldn't stick to their hands but to the seaweed instead.


Next we added our fillings. This roll had tuna, salmon, avocado, cucumber, and carrots.

Tim gripped the sushi as he rolled it and squeezed it gently to form a tight tube. He tucked the mat gently but firmly around the roll until it was complete and secure.


Then he cut the sushi into pieces with a sharp knife.

Beautiful Sushi


My kids enjoyed their wannabe onigiri rolls with edamame.


After our delicious Japanese meal, Lily finally got to add the Japan "stamp" to her passport!

Thursday, July 25, 2013

Splash! Target Practice


It was another hot one today and I decided to pick another activity to try out from the ebook , Camp Mom! Summer Activities Pack.  I had just gotten done cleaning out my pantry last week.  Ella doesn't eat any of the little baby cereals anymore, so I threw out the contents and kept the containers for this game I had seen in the ebook.  I went ahead and set up the containers along with some plastic cups in a pyramid formation . We filled up a bucket of water and loaded the Super Soaker and then it was time for target practice to begin.


Both girls took turns...

But in the end we found a Splash Ball  was easier to throw.Lily would saturate it  in water and throw it at the target. She had an easier time with that. At this age I think the Super Soaker is too hard to manage. The kids loved running up and blasting the cans they missed at point blank range.  This was an excellent activity to build hand-eye coordination and cool off at the same time.

Money Subtraction

Lily loves playing dramatic play activities. And all I can say is even though at times there may be a little more prep work to get it started, especially when we played "Post Office," it sure beats playing Barbies any day!  Since Lily was born, I  have been receiving daily activities from a website called Productive Parenting.  I signed up to receive one new activity suggestion a day based on my child's birth date. I have a whole email folder filled with activity suggestions since she was a newborn.  I finally decided to peruse some of their suggestions and I found this idea of how to teach Lily about  real life subtraction by using real money and incorporating it into a real scenario. I started by collecting little toys and goodies around the house.  Then I made price tags for all of the items. 


I gave her 20 pennies and asked Lily to come into my store and choose a toy to "buy." She would pick a toy and I would ask her to count out how many pennies she owed me.  For example, if Lily chose to buy the microphone for 16 cents then she would need to count out 16 pennies for me. I then had her count the remaining pennies she had and then we would make an oral subtraction problem out of it. Lily had 20 pennies and she bought a microphone for 16 cents. How many pennies does she have left? 20-16 = 4.  Then I would ask Lily if there was enough money left to buy any of the remaining toys.  She had 4 cents left , so she purchased the spider ring for 3 cents. 4-3 =1. And then Lily spent her last penny on the bat ring. 1-1=0.  Once she ran out of money, it was Mom's turn to shop at the store.

Lily made sure that as we continued to play the game that we chose different objects to purchase.  She wasn't a fan of the fact that whenever we had 4 cents left we ended up always buying the spider and bat rings.

Sunday, July 21, 2013

Next Stop...Japan

Daigku Imo


Japan was our next stop for the Kids' Culinary Passport. And we decided to try something we haven't made before Daigku Imo aka Carmelized Sweet Potatoes. Carmelized Sweet Potatoes is a Japanese dessert that is delicious served hot or cold.
 I found the recipe in the book , Cooking Around the World: Japanese by Masaki Ko. The first step was to slice 1 1/4 pounds of sweet potatoes thin and place them in a bowl of water with a squirt of lemon juice and a pinch of salt for 5 minutes.  This keeps the sweet potatoes from sticking to the pan during cooking.


Then slowly heat the oil for deep frying to 170 degrees Celsius. I just heated the oil until a drop of water "dances" on the oil.  I wiped the potatoes well on paper towels and deep fried them slowly until they were golden.
I drained them on paper towels and began to make the sauce.  In a saucepan, I heated 1/2 cup of granulated sugar, 1 tbs. soy sauce, and 1 tbs. of water until it was hot and began to thicken. 


We added the sweet potatoes to the caramel and turned them to coat them thoroughly. We removed them from the heat and sprinkled sesame seeds on the top.


We had homemade sushi at our friends' house two days later, but I would like to make them at home. So once we make our own homemade sushi then we will add our Japan stamp to Lily's culinary passport. We plan on doing this next weekend.

Thursday, July 11, 2013

Kids Culinary Passport (USA)


I was surfing the web and I came across this terrific project at the blog, Inner Child Fun, for Lily's summer vacation. Since, we are not traveling anywhere this summer , why not travel around the world without leaving our kitchen!  I quickly downloaded the Kids' Culinary Passport and away we went on our "voyage."


We glued a photo of Lily and of course her "babies" onto her passport and answered the questions of what was her favorite food and what was her favorite country.  She loves noodles specifically Ramen and her favorite country is China, because of Ni Hao Kai Lan.

Since we had just celebrated the Fourth of July, we decided to visit our own country first, the good ole USA.  Lily keeps getting USA mixed up with USC, her father's Alma Mater. The blog gave a suggestion to make Homemade Peach ice cream.  My mother's favorite flavor of ice cream was peach, so in honor of her and what would have been her 72nd birthday this year on the 24th of July, I thought this would be a great way to celebrate.


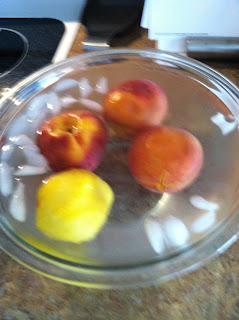
The recipe came from the book "The Perfect Scoop" by David Liebowitz.  It called for peeling the peaches first.  Let me tell you peeling peaches with a regular hand held peeler is not easy and you lose a lot of your peach meat by doing so.  I discovered a very handy trick to peel the peaches.  With a paring knife, mark an x on the bottom of each peach. Then bring a large pot of water to boiling. Fill a large bowl with ice water. Boil the peaches for 20 seconds and then using a slotted spoon transfer them to the ice water bath. Let cool and then the skins slide right off.

I then removed the peach pits and  cut the fruit into chunks.


In a medium sized saucepan, I combined the peaches and  1/2 cup of water and cooked them for 10 minutes over medium high heat, until they were soft, stirring 2-3 times.


I combined the peaches with 3/4 cups of sugar and let them stand until they reached room temperature.


Lily helped me with the next part. And yes, I am wearing shorts with that top. We pureed the peach mixture in a blender with 1/2 cup of sour cream, 1 cup of heavy cream, 1/4 tsp of vanilla extract, and a few drops of fresh squeezed lemon juice.


We chilled the pureed mixture completely and then placed it in our Rival Ice Cream maker which had not been taken out of the box since 2008. I could consider that hoarding and that's why this post is perfect for this blog.

Success!
I let Lily stay up to finally taste the ice cream. It took an hour and a half before it started to finally take shape. 


Then I had Lily place her USA sticker to her passport. Can't wait to do some Japanese cooking next week! 

Friday, July 5, 2013

Fourth of July Seder

    In honor of the Fourth of July, my husband thought it would be nice to have a seder to celebrate the holiday.  He got this idea from listening to talk show host, Dennis Prager, who has been promoting the idea of celebrating America's Independence Day with more than just hot dogs and hamburgers.  His idea was to include a short ritual during the meal to make the holiday more meaningful, especially to younger members of the family.
    The idea was to include readings by young and old about American Independence, the asking of questions by the children, and the eating of symbolic foods that remind us of the significance of the day. If this sounds familiar, it is.  Dennis modeled the ceremony on the Passover Seder.  It has successfully kept the memory of the Israelites' Exodus from Egypt alive for over 3,000 years, and the Fourth of July declaration ceremony is designed to keep the American Independence alive for future generations.
   The declaration ceremony is explained in a four-page document that can be easily downloaded  from the Prager University web site.  It includes instructions for the host, the narrative, questions, and a list of materials and food needed for the ceremony.
    Tim wanted me to find things to represent the colors of the flag, so I felt this was the perfect opportunity to use one of my hoarded Pinterest pins from my 4th of July board. I perused my pins and decided to make the Fruit Pizza.


First, I mixed up the sugar cookie batter and spread it in a pizza pan.


Then I whipped up the cream cheese filling to represent the "white stars" on our flag.


I chose strawberries, raspberries, and blueberries to represent the "Red and Blue."


The final product.


Tim did a great job trying to condense the Fourth of July seder to five minutes, so our young daughters could understand why we were doing this ceremony.  But I think they were honestly more interested in digging into the dessert that was in front of them.


Water Painting

Yesterday was the Fourth of July and instead of joining the throngs of people at the local Sun and Sail Club, we decided to have some water fun of our own in the backyard.

A couple of months ago, I had come across this adorable ebook, Camp Mom! Summer Activities Pack, that I had found on the Creative with Kids Blog.  I bought it back in May, but since Lily has been in Summer Camp for the past two weeks, I haven't had the chance to actually look at it and choose some activities for us to experiment with.  Isn't that the definition of my hoarding?  I keep things until I can actually find the time to look at them and then implement them which never seems to happen. Anyways, I decided to try out her "Water Painting" activity. We gathered some paintbrushes and a bucket from the garage. Lily and Ella had their own fun filling up the bucket with water and then I let them "paint" the backyard.

Lily painted her name and her sister's name and quickly watched how they disappeared in the heat.  I taught her the "fancy" word "evaporate." So there was even a little science built into this activity. We even played a game of Tic-Tac-Toe with the "paint."  Let me tell you water is so much less stressful to use for painting than the real thing!

And of course, eventually the "water painting" activity lead into imaginary play, where Lily decided we were all house painters and we had to paint the dust and spider webs away from her cottage.  Overall, this was a really fun activity that we will definitely break out again.  I plan on doing some more water theme activities from the Summer Pack and I will try to post how they turned out here.